The
super
probe miniaturized
Designed by Mr Carlson
Miniaturized by sv3ora
Here is my version of Mr
Carlsons Super Probe
a simple but very effective probe that can be used for finding faults
and problems in electronics circuits and components. The probe is
contact-less, meaning that you do not have to make a physical
connection to the components and circuits under test. It is so
sensitive that it can detect SMPSU noise, even from the quietest LED
lamps, from a meter away, it can detect noise from small NE2 bulbs half
meter away, mains wiring noise behing the walls and in some cases it
can even detect internal components failures without any physical
connection to them or removing them from equipment. Thats a magic
problem-solving probe for anyone that repairs electronics.

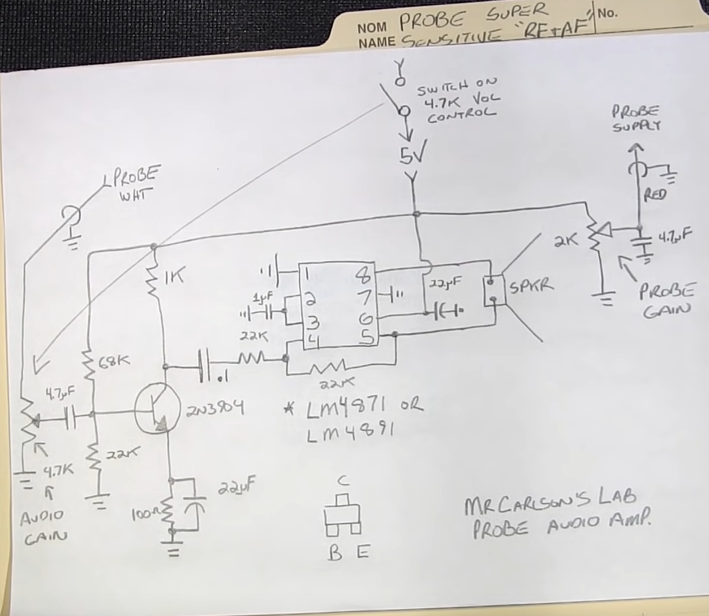
The schematic of the probe is split into two parts which are shown
above. I built mine as above and the only changes I did, were that I
used BC549C transistors in the circuit and replaced the opamp with an
LM386 in high gain mode. I also used 10K potentiometers around the
audio amplifier and fed the circuit from a 9v battery instead.
Everyone I know, has built this probe as Mr Carlson states, in two
separate enclosures. I took the challenge to build my version in a
single enclosure, actually inside the same probe, yet using only
through hole components. I even included a battery and a speaker inside
that enclosure!
The complete probe is shown below. I used small plastic potentiometers
and their shafts have been trimmed to fit into the enclosure, with a
hole on it so that they can be accessible with a screwdriver. I could
use knobs, but I thought to keep the size of the probe down to minimum.
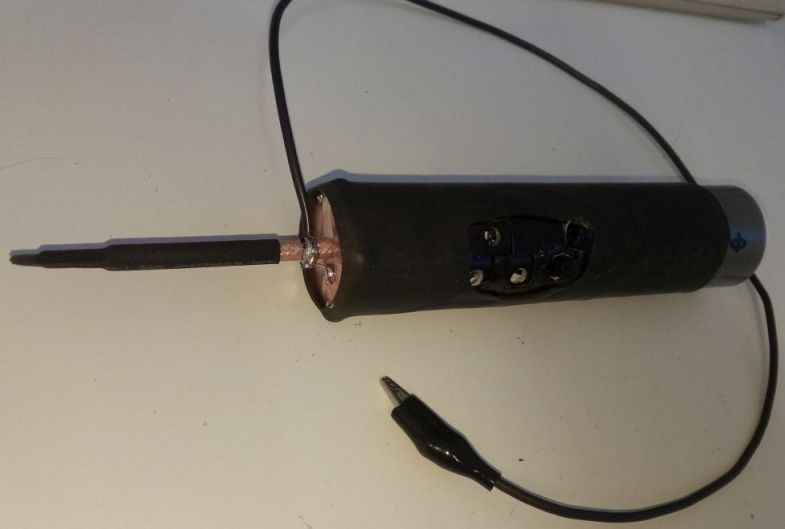
The probe has been built inside a PVC tube. Inside it, there is a
double-sided PCB that slips through it and stays in the middle of the
tube. One part of the circuit is built on one side of the PCB and the
audio amplifier on the other, as I thought this would provide maximum
isolation and prevent feedback. The PVC tube was screened with a piece
of copper sheet around it and also in the front of it, where the probe
tip extends. Note that the screen must be grounded too. The buttons and
potentiometers/trimmers for the different functions are accessed
through holes in the PVC-copper tube. To hold everything in place, a
piece of thermal shrink tube was used around the whole probe.
The speaker was embedded into the tube and behing it there is the 9v
battery. The white plastic ring (taken out of a pills enclosure) slipt
firmly into the tube and holds everything into place. Then the battery
needs replacing, the ring us pulled out and the speaker too. The
battery is the plugged out of the battery socket, which is soldered
vertically onto the circuit PCB. The battery socket is taken out of an
old 9V battery, after dissassempling it. The LED if mounted directly
behind the transparent speaker and lit through it. I sused a small blob
of hot silicone glue to keep the led firmly attached behing the
transparent speaker diaphragm.
The front of the tube is also screened by a disc of copper, cut
into shape. Note that I left a small notch on the copper
disc, so as to be able to slip out the circuit from the tube when
needed to make changes/repairs to it. The disc is soldered to the rest
of the screen around the tube and also to the braid of the
coaxial cable of the tip, using a small lead wire. This way, the
external screens of the probe, are grounded and connected to the
internal ground of the circuit. The probe tip is made exactly as MR
Carlson states in his video. In my version, the negative wire is
mounted directly to the point where the disc connects to the braid of
the coaxial cable of the tip.
As of 17 May 2023, I have not yet used the probe to do any repairs,
however this project shows clearly that such a probe can be made highly
portable even without using SMD components. Here
is s small (6.5Mb) video, showing the super prope being able to pick up
audio by the meter movement of the Collins 51S-1, by bringing it near
the meter. Yes, it is that sensitive. Happy repairing!
-------------------------------------------------------
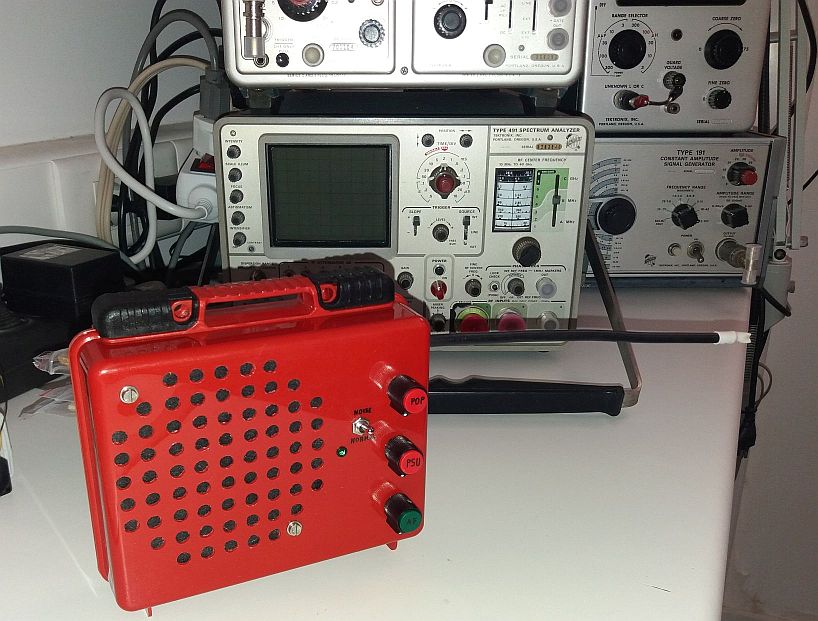
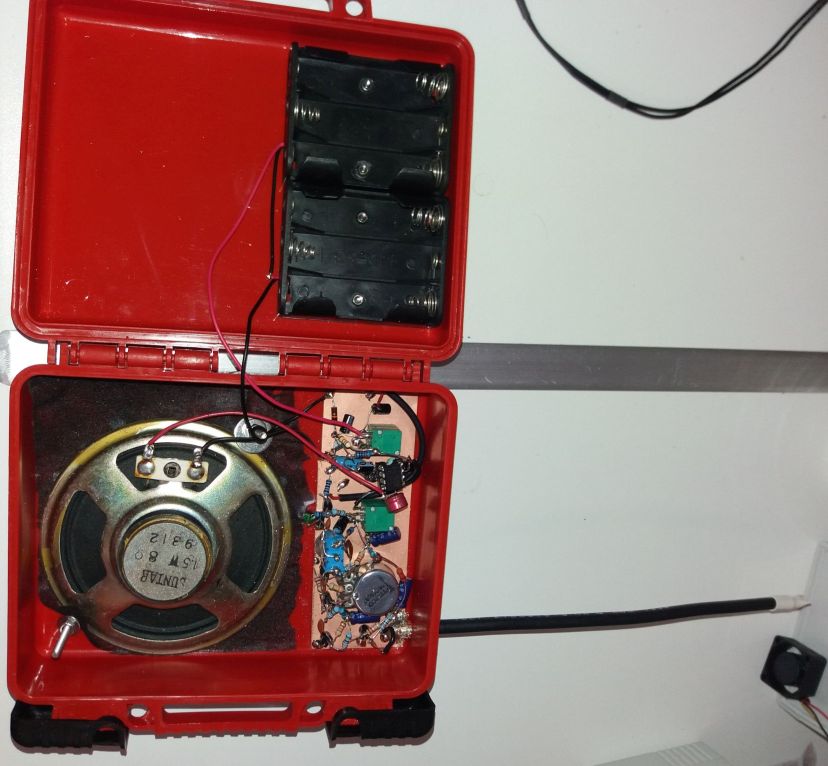
UPDATE 14-Jul-2024
Here is another way of making this probe in a self-contained unit. I
used a case out of those first aid car kits. It actually turned out
very well, as the batteries can be easily replaced and repairs can be
easily made. The probe works great. I used a longer piece of coaxial
cable for the probe, so I can stick it inside circuits easily. But the
probe is self-contained and portable. This time I did not use any
ground aligator clip, as the probe seems to work well even without it.
Back to main
site